| |
| |
 |
|
| |
|
|
 |
March 2007
|
 |
| |
|
|
|
| |
In this issue:
1. Who Wants a Longer Address Field?
2. Lawson Design Studio, Part 4: Streamlining a Form
3. Worthwhile Reading
4. Lawson Tips & Tricks
The LawsonGuru Letter is a free periodic newsletter providing provocative commentary on issues important to the Lawson Software community. The LawsonGuru Letter is published by—and is solely the opinion of—John Henley of Decision Analytics.
Visit Decision Analytics at https://www.danalytics.com. For subscription information, see the bottom of this message.
Lawson® is a registered trademark of Lawson Software, Inc. The LawsonGuru Letter is neither affiliated with nor sponsored by Lawson Software, Inc. Lawson Software, Inc. is not responsible for the content of this information.
|
|
|
| |
|
|
|
| |
1. Who Wants a Longer Address Field? |
|
|
| |
It's an issue I debate with clients on a seemingly-constant basis, and one I always argue against.
Although Lawson provides several address fields for Vendors, Customers, and Employees, Lawson clients think the fields themselves (30 characters for the address line; 18 for the city) are just too short. So, the client decides they should modify the field/database definition.
Here's my stock response.
Theoretically, it's not a big deal to make this change:
- Change the element size in dbdef
- blddbdict
- dbreorg
- cobcmp (you should recompile the entire system)
You would then need modify the maintenance screens (e.g. AP10, etc.) that update these fields, and recompile them.
HOWEVER -- PLEASE PROCEED WITH CAUTION !!!
What you are making is MODIFICATION to the BASE LAWSON DELIVERED PRODUCT. This can have SIGNIFICANT IMPACT on your ability to maintain and upgrade Lawson. For example, since you are modifying the standard Lawson tables, when you install an MSP you will need to use the Manual installation process--you can no longer use the Automated process. You also have to be prepared that this change may be undone if any CTP changes the base table (e.g., APVENMAST) and requires a dbreorg. You would need to intervene before the dbreorg and reapply your table modification. Same applies to version upgrades, like the upcoming 8.x -> 9.x Applications upgrade many of you are now undertaking.
The other part of the modification is that you have to comb through and change the references to that field in the various pieces of shared/library code in which it is used, which are defined with the same size as it is in the table. The interesting thing is that Lawson gave itself the mechanism via element definitions to define it ONCE and then use "LIKE ..." syntax which the bismark pre-compiler then replaces with the appropriate COBOL PICture clause. However, Lawson hasn't used this mechanism consistently.
Having said all of that (I just want you to be aware of the implications of making this type of a modification), longer addresses is a fairly common request; an enhancement which Lawson should have made in the base product a long time ago. So I empathize with your reasons for wanting to make the change.
If you absolutely must make this modification, here's a way you can do it less intrusively (i.e. reducing the risk of getting clobbered by an MSP/CTP). Create some subordinate "longer address" tables which are related/joined to the primary tables (e.g., APVENMAST/APVENADDR). Then use some Design Studio form modifications to allow for entry into the longer address tables. Depending on why you're changing the addresses, you can then clone the various programs (AP155, AP160, etc.) on which you want to present/report the longer addresses. Using this method will avoid a lot of pain and agony in the future.
|
|
|
| |
|
|
|
| |
2. Lawson Design Studio, Part 4: Streamlining a Form |
|
|
| |
|
|
|
| |
In this installment of our Lawson Design Studio article series, we will explore some features of the UI Designer. In the previous article (see https://www.danalytics.com/guru/letter/archive/2007-02.htm) I characterized the UI Designer into two tiers of tools:
- The UI Designer, by itself, lets you make simple (and even some complex) changes to the “look-and-feel” of your Lawson application forms.
- To create even more complex customizations, you combine the API Builder and JavaScript components of Design Studio with the UI Designer.
In this article, we will create--based on a simple design specification--a customized form using the UI Designer.
A few notes on this article:
- Explaining how to use Design Studio and its features via a static article is impossible. Yes, I do gloss over some steps in this article. My intention is to show you the highlights of modifying a form and to whet your appetite and imagination.
- This is not a replacement for Lawson’s documentation; as such, this article is not a re-hash of ‘this is a menu bar, this is the toolbox”, etc., etc. If you want more detail, read the documentation and consider attending a Lawson-provided training session.
- Design Studio isn’t perfect; it can be flaky. Remember that it is a browser application. It can’t do everything and it does hang, but not as much as it used to. If you’re just starting out with it, you will achieve a certain level of frustration—I guarantee it. Even if you’re an experienced user, expect to lose your work on occasion. There are some ways to mitigate that (perhaps we’ll explore this topic in a future article). But, as I like to tell people: “it is what it is”.
Our Design Specification
There are many Lawson-delivered forms that you can streamline to suit your organization’s purposes. The Design Studio UI Designer gives you the capability to create streamlined forms by:
- Simplifying forms for easier entry
- Setting default values for quicker processing
- Consolidating Form Tabs
- Rearrange Header and Line Fields
- Re-arrange field order and Tab key order
- Adding an image or logo to a form
- Removing unused fields
- Exposing hidden fields
- Moving fields from “More” buttons to main form itself
- Renaming field labels to match your terminology
- Repurposing User Fields
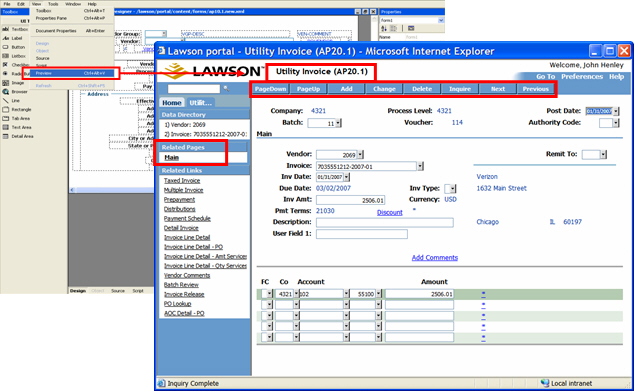
In this example, we are going to create a customized version of AP20 Accounts Payable invoice form, and streamline it for entering utility invoices. Out-of-the-box, AP20.1 looks like this:
We are going to streamline this form by:
- Removing all PO-related fields, since utility bills aren’t associated with a Purchase Order
- Changing any fields that don’t require entry to display-only
- Defaulting certain data values on fields which are consistently the same on utility bills
- Removing unused tabs (i.e. Related Pages) which aren’t required for utility invoices
Accessing Design Studio
Lawson Design Studio—like Lawson Portal—is a browser-based application. It is an add-on product (i.e. you have to be licensed for it, and install it separately from Lawson Portal). So, if you have Design Studio, enter the URL to access it:
Env 8: http://<lawson web server>/lawson/portal/studio
LSF9: http://<lawson web server>/lawson/studio
Once you log in, select the ‘New’ tab, choose the UI Designer, and double-click on the Form icon:
“QuickPaint”? I thought that as a LID application...
This starts the ‘New UI Wizard’, which we’ll use to create a starting point for customizing the form; Select a Product Line, System Code, and Form:
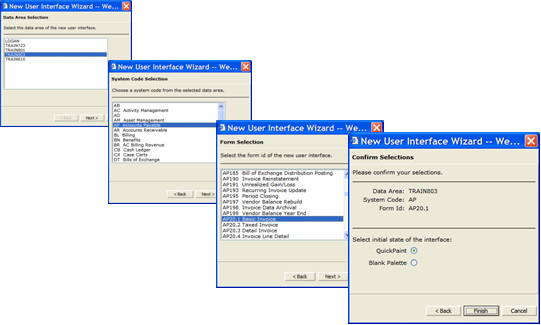
No, this is not that same QuickPaint you might have used before (via LID) to create Lawson forms for data fixes, etc. However, the concept is the same. The UI Designer reads the underlying form information (i.e. the .xml file associated with the form) and gives you a great starting point for modifying an existing form. Essentially, once you have this QuickPaint’d form, all you need to do is remove some fields.
Form Components in the UI Designer
Once you’ve QuickPaint’d the form, you can see it in the UI Designer:
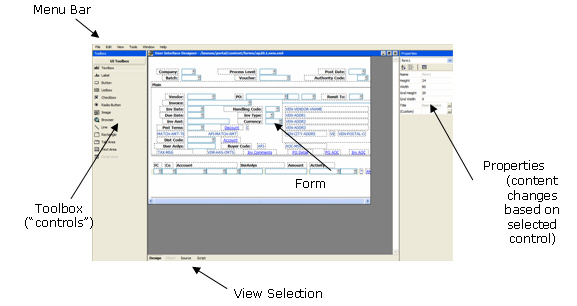
One thing that will take some adjustment is that Design Studio has its own menu bar, which displays underneath the browser’s menu bar:
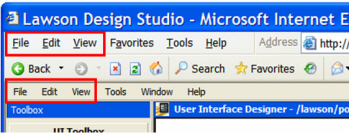
On countless occasions, I’ve dropped-down the wrong ‘File’ menu and tried to ‘Save’ the Lawson Design Studio .xml file using the IE menu bar!
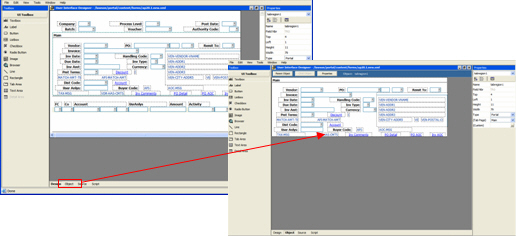
Working with “Container” objects
Many Lawson forms use “Container” objects (Lawson calls these “complex objects”) for tabs and detail areas. In other words, a detail line “contains” other objects (i.e. text boxes, etc.). In order to change an object on a tab or detail line:
- Highlight the object that “contains” the object you want to modify
- Click on the ‘Object’ button
- The UI Designer window then displays the container object
- Make your changes
- Click on the ‘Parent Object’ to close the Container object and return to the parent.
Let’s Begin
We start by removing PO-related fields; simply click on the fields, and press Delete:
Setting Some Defaults
In this step, we’re going to default in the value for Invoice Company to be the same as the Company to which the user is assigned on RD30/LSF RM:
Set Display-Only Fields
We’re also selecting some fields, and making them display-only (i.e. user can see the but not enter into them). Select the field, then click the ‘Custom’ property and select the ‘Output Only’ checkbox:
...and Remove Some Unused Tabs
Relocating Fields from One Tab to Another
One of the ways to streamline a form is to move often-used fields from one tab to the 'Main' tab. In this example, we're going move Invoice User Field 1 to the main tab. (Using the same technique, I also move Description from the 'Options' tab to the 'Main' tab).
As an aside, you might want to streamline a form so much that you really don't need to have tabs on the form at all. Although the UI Designer doesn't provide that capability, there are two ways you can do it if you're an advanced user of Design Studio: 1) If know what you're doing, you can edit the XML (using the Source button in the View selection); or 2) don't use QuickPaint to generate the starting point for the form; use 'Blank Pallete' when you're creating the form, and then add only the fields that are needed.
Back to our form. First, highlight and delete the field from ‘User Fields’ Tab:
Return to the 'Main' tab and double-click ‘Label’ in toolbox to insert a label; drag to new location, and click ‘Text’ to insert text:
Linking a Data Field to the Back-End form
Now we need to insert the Invoice User Field on the Main tab.
In one of the introductory articles, I talked about how Design Studio .xml files contain the information that Lawson Portal uses to link each object on the form back to the underlying Lawson application forms. This is done via Data Fields--each Data Field object on the Design Studio form is “linked” to an object on the underlying Lawson form. Double-click ‘Textbox’ in toolbox to insert a new field; click ‘Data Src’ to select which field on the underlying Lawson form to which the textbox should be bound:
Let's Work on the Details Section
- Remove the User Analysis and Activity / Account Category fields.
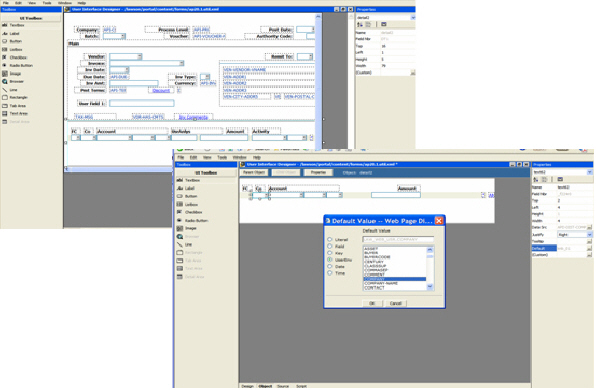
- Default in values for Company, Accounting Unit, Account, and Sub Account.
- Set the Company default just like we did above for the Invoice Company.
- For the Accounting Unit and Account/Sub Account, use a "literal" value that makes sense for your accounting for utility invoices:
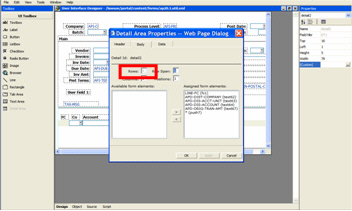
There's one thing you cannot do in the detail section—change the number of lines. That’s because it’s a function of the underlying form:
The Finishing Touches
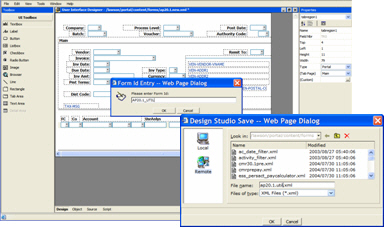
The last thing we’ll do is change the title that displays on the form. To do this, select the form and click the ‘Title’ property to enter a new title:
Saving your Creation
Let's keep this simple and not get into a discussion of Local vs. Remote. Save your new form to the 'Remote' (the Lawson Web Server) location:
Admiring Your Work
Use the ‘View | Preview’ menu option to preview your streamlined form (yes, it’s a “live” functioning form!)
In an upcoming article, we’ll dig into the topic of deploying your custom Design Studio forms.
|
|
|
| |
|
|
|
| |
3. Worthwhile Reading |
|
|
| |
|
|
|
| |
Misgivings
- QUOTE OF THE ISSUE –
“Keep your fears to yourself, but
share your inspiration with others.”
-- Robert Lewis Stevenson
Recent studies raise an uncharitable question: Is nonprofit accounting off track?
CFO Magazine, January 2007
http://www.cfo.com/article.cfm/8477078/c_8483311
IT Culture: Too Safe For Comfort
InformationWeek Research finds many IT shops are overly cautious when it comes to experimenting with new technology. It's time to get back to innovation that drives business.
Information Week, January 29, 2007
http://www.informationweek.com/shared/printableArticle.jhtml?articleID=197000833
Go Green, Get Rich
Meet the companies tackling nine of humanity's biggest problems -- and making millions saving us from ourselves.
Business 2.0, January/February 2007
http://money.cnn.com/galleries/2007/biz2/0701/gallery.9problems/index.html
|
|
|
| |
|
|
|
| |
4. Lawson Tips & Tricks |
|
|
| |
Share your Tips & Tricks. Send them to mailto:letter-tips@lawsonguru.com.
You can view other Tips & Tricks on the Tips & Tricks page on LawsonGuru.com.
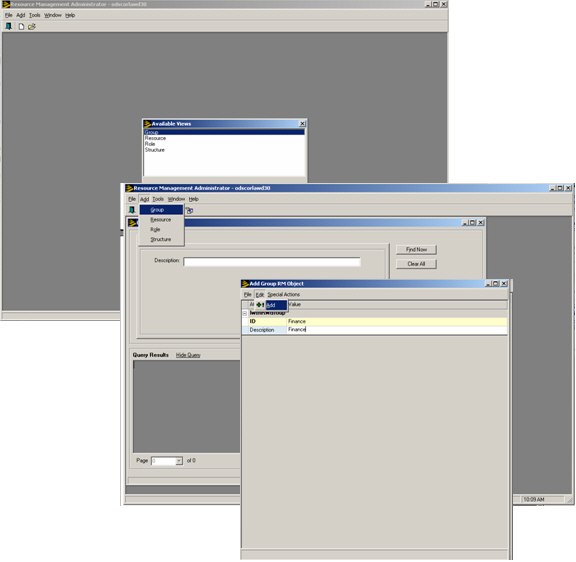
How to assign a Portal 9.0 Bookmark to a Group of Users
In Lawson Portal 9.0, how do I assign a Portal Bookmark to a group of users?
First, create the Group in Resource Management Administrator:
Then, edit each Resource to add them to the new Group:
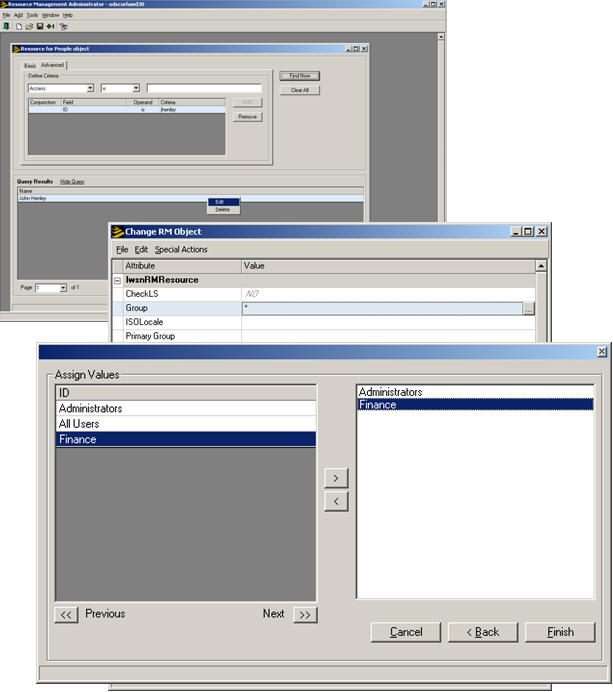
(Note to Lawson: please add an ‘Add People Resources to Group’ option)
Then, go into Portal Bookmark Manager, and Add the Group’s access to the desired bookmark:
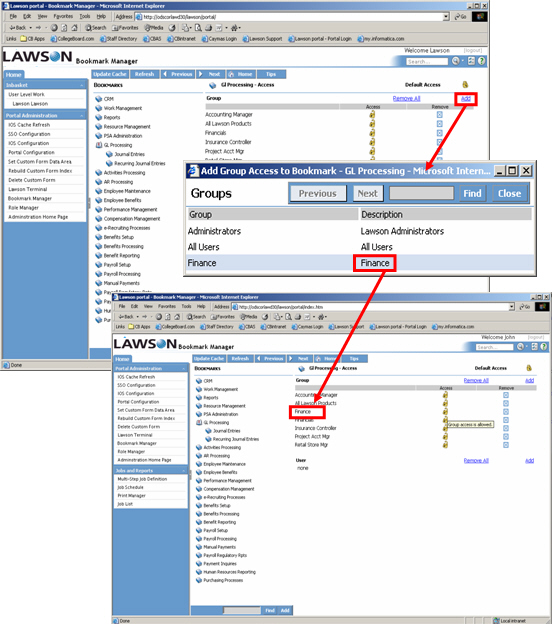
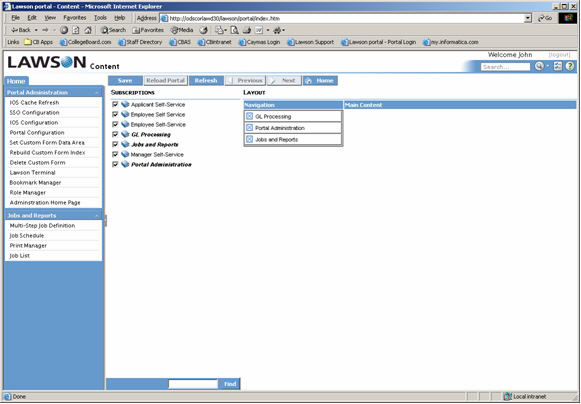
Finally, each user still has to go and “subscribe” to the content:
|
|
|
| |
|
|
|
| |
© Copyright 2007, Decision Analytics. All rights reserved. |
|
|
|
| Please share The LawsonGuru Letter in whole or in part as long as copyright and attribution are always included.
Lawson® is a registered trademark of Lawson Software, Inc.
The LawsonGuru Letter is neither affiliated with nor sponsored by Lawson Software, Inc.
Lawson Software, Inc. is not responsible for the content of this information.
|
| |
|
Decision Analytics is an independent consultancy, focusing on Lawson technical projects, and specializing in reporting, customization/modification, data conversion, and integration/interfaces. Please visit https://www.danalytics.com for more information.
|
|